Tips to Take Your Tiling Skills to the Next Level
It’s not hard to see why DIY tiling is popular. They are a great way to add colour, style, function and art to any space. Tiling adds design and interest to your floor in the bathroom, kitchen or entranceway. It can also be used to create custom-designed shower walls or backsplashes for your home.
These tips can help you improve your tiling abilities so that your projects look as if they were completed by a professional.
Plan, Measure, and Cut in Advanced
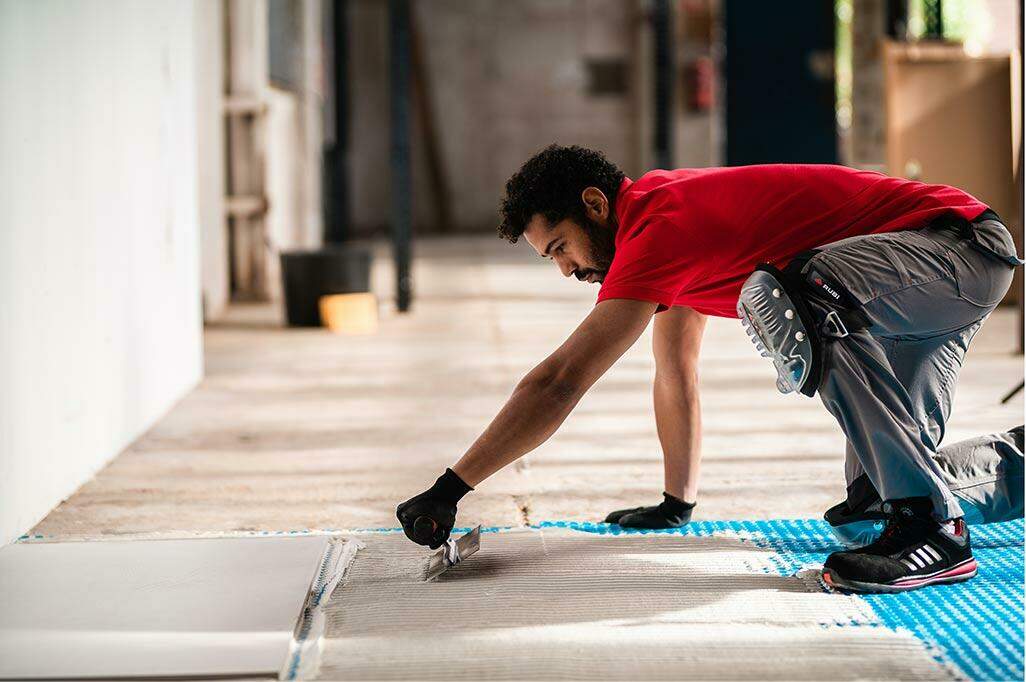
Plan, measure and cut tiles in advance is the first tile pro tip. You should decide what pattern you would like to create, and then arrange the tiles according to that pattern. Take exact measurements and make sure the tiles will fit into your space. Measure tiles, cut them down with tile cutters and then measure again to ensure they fit perfectly.
This will ensure that your tiles are a perfect fit and make the rest of the job easier. We all make mistakes. Buy a few extras of each colour in case you need them.
Before you install the tiles, clean them first
Use a damp cloth to clean the tiles after you’ve cut them or unpacked them. Make sure that the tiles are completely dried before using them. By removing debris, you can prevent small tiles and dust from becoming stuck beneath or under the tiles. This will make your work look unprofessional.
Remove Doors Fixtures and Appliances
Remove all fixtures and doors before you begin tiling. You won’t need to move anything as you tile, and you can avoid obstacles that could ruin your pattern and workflow.
Mix Adhesive with Grout in Small Batches
Even if you know how much grout and adhesive to use, it is still best to mix the mixture in smaller batches. This makes it easier to handle, and it prevents the mixtures from drying out before they can be used.
Work from the Centre and Work in small areas
Installing tile correctly requires you to start at the centre and work outwards. Use a measuring tool to mark the center of the surface. Then, using a chalk line or ruler, divide the area into four sections. The intersection of these two lines will be the centre.
Start in the middle, and then lay the tile in each quadrant. Start in the middle to ensure that your pattern will look its best. Working in small sections makes it easier to use the adhesive.
You can use the lines that you have drawn to ensure you are laying the tiles in straight lines. You may need to draw a diagram of the pattern and then use that as a guide when installing each section. Do not forget to use spacers when installing the tiles. For a perfect finish, consider engaging experienced tilers in South Auckland.
Do Notch Your Adhesive
Use a floor trowel in a diagonal motion to make notches after you have applied grout to the small marked areas. You can then apply the correct amount of adhesive. If you apply too much adhesive, it will leak out between the tiles and look bad on the final product. If you do not apply enough adhesive to the tiles, they will not be properly installed.
Allow Open Time
The “open time”, the time that you allow adhesive to set before installing tile is important. This ensures the adhesive is strong enough to adhere the tile securely, and will function properly. Follow the instructions on the adhesive label to determine the time for the adhesive to open.
Compensation for Walls and Floors with Imperfect Surfaces
There is a possibility that your walls and floors are not perfectly smooth or level. Some walls don’t look flush and some floors are actually slightly slanted in certain areas. Before you begin tiling, use a level to check this.
You can compensate for these imperfections by taking a few simple steps. Use a level when laying the tiles to ensure they are level. Add or remove adhesive from under the tiles if they are not level.
Do not use Grout immediately after Tiling
It’s tempting, after you tile a new backsplash or floor, to add grout between each tile. Resist the urge to add grout between tiles, as this can ruin your tiling project. If you apply grout to tiles with the adhesive still wet, they may move and ruin your job. Make sure that the adhesive has completely dried before using grout.
Apply Grout in a Diagonal Direction
Use a grout float to apply the grout in diagonal, smooth motions. This will give you a more even finish than if you were to use straight horizontal or vertical lines.
Keep Extra tiles on Hand
You should have purchased extra tiles when you bought them, just in case. Keep some extra tiles on hand to make easy repairs. It is important to keep extras on hand if your project uses specialized tiles, or very specific colors or designs. These may be difficult to locate if repairs are needed later.
Tile installation is an easy DIY project you can do in one weekend. It can make your bathroom, kitchen or shower look brand new. If you follow these tips, your tile installation project will look as if it were done by professionals.


Post Comment